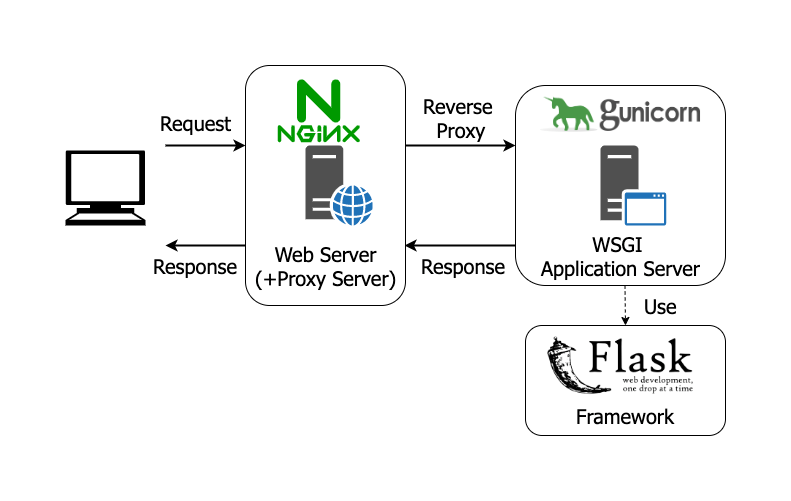
What is NGINX? 🤔
NGINX (pronounced “engine-X”) is an open-source web server that excels at load balancing, caching, and acting as a reverse proxy. NGINX was developed with efficiency and concurrency in mind, seeking to address the scalability and performance issues in other popular web servers. Its event-driven architecture continues to set it apart as one of the highest-performing web servers available. This guide aims to show you how to deploy a Flask App with NGINX using Gunicorn.

Now you must be thinking wtf is Gunicorn? 😮
Green Unicorn (Gunicorn) is a Python WSGI (Web Server Gateway Interface, aka Wiz-ghee) server that runs Python Web Application code. It’s one of many WSGI server implementations, but it’s particularly important because it is a stable, commonly-used part of web app deployments that’s powered some of the largest Python-powered web applications , such as Instagram.

Before we start making our hands dirty, here are the prerequisites 🤩 :
- Python 3.x+ (version 3 and above)
- Flask
- Nginx
- Gunicorn
- Venv (Virtualenv also works)

Steps 🧗♂️ :
⚠️ It’s noted that the setup is intended for Python 3.x+ and above. Hence, 2.7.x and below versions are not supported with current provided method. The OS used is Ubuntu 22.04 LTS. Feel free to use any other OS.
(1) ➤ Update your local package index and then install the packages :
1# 1. update your local packages2sudo apt-get update3# 2. install dependencies4sudo apt-get install python3-pip python3-dev nginx

(2) ➤ Create Venv :
💡 Venv already comes with Python 3.x+ and above. No need to install it seperately. It serves a similar purpose to virtualenv, and works in a very similar way, but it doesn’t need to copy Python binaries around (except for Windows).
1python3 -m venv <your venv>

(3) ➤ Setup Flask App :
1# create a flask app by installing Flask & Gunicorn2pip install gunicorn flask
👉 Now as we have installed Flask we can create a flask application. Create a file named app.py and paste below content :
1from flask import Flask2app = Flask(__name__)34@app.route('/')5def welcome_page():6 return "Namaste!"78if __name__ == '__main__':9 app.run(debug=True,host='0.0.0.0')
Now, you can test your Flask app by typing :
1python app.py
Generally, the default port is set at 5000. Hence, you can test your Flask app by visiting: http://localhost:5000
You should see: Namaste! in your browser ✨. When you are finished hit Ctrl+C in your terminal window to stop the server process. Do note that it’s “http” & not “https”. If you want to try it out in “https”, follow this.

(4) ➤ Setup WSGI Entry Point 💻 :
Create a file named wsgi.py which will tell Gunicorn server how to interact with the app :
1nano ~/src/wsgi.py
Now we can simply import the Flask instance from our App and run it :
1from app import app23if __name__ == "__main__":4 app.run()
Save & close the file when done. The Folder Structure looks somewhat like this :
1src2 |____ app.py3 |____ wsgi.py4 |____ myprojectvenv

(5) ➤ Testing Gunicorn :
We’re using Gunicorn to serve the project. This can be done by the name of the module (except .py extension) plus the name of the callable within the application (i.e ) wsgi:app. We’ll also specify the interface and port to bind to so that it will be started on a publicly available interface :
1cd ~/src23gunicorn --bind 0.0.0.0:5000 wsgi:app
Visit http://localhost:5000 you should see: Namaste! in your browser again.
Now deactivate virtualenv by following command 🚫 :
1deactivate

(6) ➤ Create a systemd Unit File :
systemd unit file will allow Ubuntu’s init system to automatically start Gunicorn and serve our Flask application whenever the server boots. Create a unit file ending in .service within the /etc/systemd/system directory to begin :
1sudo nano /etc/systemd/system/app.service
Inside nano, you should be able to see the following :
1[Unit]23# specifies metadata and dependencies45Description = Gunicorn instance for serving myproject6After = network.target78# Tells the init system to only start this after the networking target has been reached910# We will give our regular user account ownership of the process since it owns all of the relevant files1112[Service]1314# Service specify the user and group under which our process will run.15User = yourusername1617# give group ownership to the www-data group so that Nginx can communicate easily with the Gunicorn processes.18Group = www-data1920# We'll then map out the working directory and set the PATH environmental variable so that the init system knows where our the executables for the process are located (within our virtual environment).2122WorkingDirectory = /home/neilblaze/test/src23Environment = "PATH=/home/neilblaze/test/src/myprojectvenv/bin"2425# We'll then specify the commanded to start the service26ExecStart = /home/neilblaze/test/src/myprojectvenv/bin/gunicorn --workers 3 --bind unix:app.sock -m 007 wsgi:app2728# This will tell systemd what to link this service to if we enable it to start at boot. We want this service to start when the regular multi-user system is up and running:2930[Install]31WantedBy = multi-user.target
⚠️ Note: In the last line of [Service] We tell it to start 3 worker processes. We also tell it to create and bind to a Unix socket file within our project directory called app.sock. We’ll set a umask value of 007 so that the socket file is created giving access to the owner and group, while restricting other access. Finally, we need to pass in the WSGI entry point file name and the Python callable within.
We can now start the Gunicorn service we created and enable it so that it starts at boot:
1sudo systemctl start app2sudo systemctl enable app
Folder Structure 🗃️ :
A new file app.sock will be created in the project directory automatically.
1src2 |____ app.py3 |____ wsgi.py4 |____ app.sock5 |____ myprojectvenv

(7) ➤ Configuring Nginx ⚙️ :
Gunicorn application server is now be up and running and it waits for requests on the socket file in the project directory. We need to configure Nginx to pass web requests to that socket by making some small additions to its configuration file.
We’ll need to tell NGINX about our app and how to serve it. Just cd into /etc/nginx/. This is where the NGINX configuration files are located.
The two directories we will work on are sites-available and sites-enabled.
sites-availablecontains individual configuration files for all of your possible static app.sites-enabledcontains links to the configuration files that NGINX will actually read and run.
Create a new server block configuration file in Nginx’s sites-available directory named app.
1sudo nano /etc/nginx/sites-available/app
Open up a server block in which nginx will listen to port 80. This block will also be used for requests for our server’s domain name or IP address:
1server {2 listen 80;3 server_name server_domain_or_IP;4}
Let’s add a location block that matches every request. In this block, let’s include the proxy_params file that specifies some general proxying parameters that need to be set. We’ll then pass the requests to the socket we defined using the proxy_pass directive :
1server {2 listen 80;3 server_name server_domain_or_IP;45location / {6 include proxy_params;7 proxy_pass http://unix:/home/neilblaze/test/src/app.sock;8 }9}

(8) ➤ Final Step — Enable NGINX server block :
Link the file to the sites-enabled directory to enable Nginx server block we’ve just created. The syntax is as follows :
1# ln -s <SOURCE_FILE> <DESTINATION_FILE>23sudo ln -s /etc/nginx/sites-available/app /etc/nginx/sites-enabled/app
Note: Test syntax errors by typing: sudo nginx -t. If there are no issues, restart the Nginx process to read our new config:
1sudo systemctl restart nginx
The last thing we need to do is adjust our firewall to allow access to the Nginx server:
1sudo ufw allow 'Nginx Full'
Now visit server’s domain name or IP address in your web browser where your application is actually running.
1http://domain__or__IP
Congratulations — Deployment Successful! 🎉⚡

References 🙌
Conclusion 🚀
That’s it for now! I hope you learned something valuable. Stay tuned for more such blogs 😄


