

Preface ⚡
Join me in my Google Summer of Code 2023 ☀️ journey with TensorFlow as I showcase an Interactive Web Demo highlighting Touchless Interactions using the MediaPipe’s Machine Learning Library.
Presenting MediaPipe ATM Playground ✨

This project aims to test and demonstrate the capabilities of the new MediaPipe Hand Landmarker task from MediaPipe Solutions. The task provides precise and accurate hand landmark detection, generating 21 key points (i.e. hand landmarks) on the hand.

These landmarks are utilized in this interactive web app which enables users to perform contactless interactions with the interface using simple human gestures. Best experienced in well-lit environments. Ideal on larger screens.
💡For more information about the project, please visit here: Interactive Web Demos using the MediaPipe Machine Learning Library.
How the idea emerged 🤔
As technology hurtles forward, the aftermath of the COVID-19 pandemic has cast a new light on interaction. The awareness of touch-related risks is sharp, with 80% of people viewing public touchscreens as unhygienic 🦠
Touchless gesture-based systems hold the potential to reshape public spaces, workplaces, and industries. This technology’s seamless and convenient nature aligns with the post-pandemic landscape. Touchless interactions are poised to become commonplace in sectors spanning ATMs, airports, retail, healthcare, hospitality, and beyond.
So I decided to take the first step! That is how the idea for this project emerged: a response to the evolving expectations and demands of a world seeking safer, more intuitive, and advanced methods of interaction. By translating everyday hand gestures into a digital language, we can drive the wave of change toward touchless interactions.
This project is a symbol of my commitment to embracing the future, harnessing innovation, and crafting a more hygienic, efficient, and enchanting way to connect with technology! ✨
DISCLAIMER 📢
This blog aims to guide fellow developers in utilizing the MediaPipe library and implementing similar touchless interaction features in their projects.
ⓘ All data taken via input video feed is deleted after returning inference and is computed directly on the client side, making it GDPR compliant.
It’s a comprehensive read, so buckle up and enjoy the ride! 🚀
🏗️ TUTORIAL: The Interactive Web Demo

Before we start ✋
MediaPipe Solutions lets you apply machine-learning (ML) solutions to your apps. It provides a framework that lets you configure prebuilt processing pipelines that deliver immediate, engaging, and useful output to users.
📌NOTE: You can even customize these solutions with Model Maker to update the default models. I’ve covered how to use a Model Maker in another blog of the GSoC series, which can be explored 🔗here.
Hand landmarks detection is one of several ML vision tasks that MediaPipe Solutions offers. MediaPipe Tasks is available for Android, Python, and the Web. The MediaPipe Hand Landmarker task lets you detect the landmarks of the hands in an image. This Task localizes key points of the hands and render visual effects over the hands.

ⓘ If you want to delve deep into the specs of the model, feel free to explore the official docs, which can be found here. You can access the official model card for MediaPipe Hands (Lite/Full) here. It provides detailed information about the model.
You can also refer to the official research paper on the same, available 🔗here.

What you’ll learn 📝
- How to incorporate MediaPipe Hand Landmarker task in a web app.
- How to create a set of custom gestures for the Hand Landmarker task.
- How to optimize and precache the (same) web app for offline use.
What you’ll build 👨🔬
An interactive web app which enables users to perform contactless interactions with the interface using simple human gestures.
💎The ultimate product will be a web app that showcases a special ATM which showcases an augmented transaction panel, enabling users to interact accurately through intuitive gestures detected from an input video feed. Users can perform essential operations directly through the interactive floating panel (on screen) via custom simple-to-use gestures, allowing them to experience the checkout process without the need for physical touch.
What you’ll need 🛠️
- A local development environement with Node.js installed (else a CodeSandbox account also works fine)
- A device with a web browser & webcam
- Basic knowledge of React.js, JavaScript, CSS, and HTML
📢NOTE: To simply the process & to write less code, I’ve used Tailwind CSS & Redux in this project. If you’re not familiar with these, you can refer to the official docs, which can be found here & here. Most of the static assets have been handcrafted using Figma, & royalty free audio files (from Pixabay) have been used for the sound effects.
Installing Tailwind CSS with Create React App is pretty simple and straightforward. Head over to this to get started! 🤩


Get set up 🚀
To run the webapp code directly on browser, we can use CodeSandbox, a social development environment that lets you write & edit code, and can instantly reflect changes as you edit. To run it locally on your device (e.g. PC), you need to have Node.js installed.
⚠️Webcam is essential & required for hand detection and gesture recognition. Please ensure your device has a functioning webcam.
To access the code on CodeSandbox, navigate to this CodeSandbox Template. The webapp should instantly spin up in the preview panel.
🛑If your browser presents a dialog that asks you to grant access to the webcam, grant permission by clicking on “Allow”!

💡For the best experience it’s recommended to open the app in a new tab. You can do so by clicking it on this button ↓
📥You can also
forkit by clicking on Fork (as shown in the above image) or just by “Ctrl + S” (“Cmd + S” on Mac) to save a copy of the project in your CodeSandbox account. This will allow you to edit the code and save your changes.⚠️Don’t make any changes to the
.codesandboxcongifuration files. It may break the app.

Installation Process (local machine) 💻
To run the app on your local, open your terminal and follow these steps:
-
Clone the repository on your local machine:
SHgit clone https://github.com/googlesamples/mediapipe.git -
Navigate into the project directory:
SHcd tutorials/atm_playground -
Install the necessary dependencies:
SHnpm install -
Start the development server:
SHnpm start -
Open the project in your browser at “
http://localhost:3000” to view the project.

🏷️The primary objective to use React is to have modularity. In the end, when a build is created, the application’s components, logic, and styles are bundled, minified, and optimized for production. This results in a highly efficient and performant web application that can be easily deployed to various platforms.
The use of React’s component-based architecture allows for the development of complex UIs by breaking them down into smaller, reusable components, enhancing code maintainability and reusability.
The app is quite extensive in structure, so I’ll be leading you through each file and folder, explaining the code as we go along. This approach ensures a comprehensive understanding of the application’s architecture, enabling effective collaboration and development.
🦄 View a live demo in your browser 🔗here.
Architecture Overview 🧱

UX Flow 🎨
1️⃣Once you open the app, you’ll be greeted with a landing page. The app will ask for permission to access your webcam. Click on Allow to grant permission.
2️⃣After enabling the webcam, necessary models load, and upon hand detection, a cursor appears on-screen. This cursor, controlled by hand gestures (for both hands), interacts with the interface, allowing operations through gesture-triggered interactions.
3️⃣You’ll be redirected to the login page where a walthrough is presented via app’s information modal which essentially displays that the user can perform the following operations via gestures:
- HOVER 🤚 : This is the base gesture. Use the cursor on the tip of your index finger to hover over the elements and perform specific operations.
- CLICK 👌 : This gesture is used to click on the elements you’re currently hovering over.
- UNDO ✋ : This gesture undoes the last action, handy for accidental clicks on the ATM PIN Entry Panel. Alternatively, the “Backspace” key on your keyboard achieves the same.
- GRAB ✊ : This gesture shows the app’s information modal, detailing available gesture actions and additional app details.
💡You can also use the “ESC” key to navigate back to previous screens, on certain pages.
4️⃣After logging in, you’ll see the ATM PIN Entry Panel. Use the cursor to select numbers for your PIN. On entering the correct PIN, you’ll access the main dashboard. Use the undo gesture to remove the last digit. Warnings may appear for empty/wrong PIN or trying to delete a non-existent digit.
5️⃣Now you can see your Account dashboard, where you have multiple options to choose from. You can either check your account balance, withdraw cash, or even check your mini statement. You can also logout from the dashboard by pressing “ESC” key, which will redirect you to the login page.
- Withdrawing cash is pretty simple. You can hover over the amount you want to withdraw and click on it. You’ll be presented with a confirmation tab, where you can click on “WITHDRAW” to confirm the transaction. You can also click on “CLEAR SELECTION” to reset the chosen amount. Once the transaction is confirmed, you’ll be presented with a success message. Click on “ESC” to return to the main dashboard.
Folder Structure 📁

ⓘ This has the default folder structure that comes with Create React App.
NOTE: An
.envfile has been created to setGENERATE_SOURCEMAPto False. Feel free to refer to this to know more. It’s completely optional, & is just there to remove minor dependency warnings.
Let’s start delving deep into the project! 👨💻
First, let’s take a look into the package.json file which is a configuration file for npm that defines the dependencies for the project. This is what it looks like 👇

🧙 NOTE: A package-lock.json file is a JSON file automatically generated by npm when packages are installed, and it locks the specific versions of dependencies to ensure consistent and reproducible installations across different environments, enhancing dependency management and project stability.
Let’s focus on some of the important dependencies:
| Dependency | Description |
|---|---|
| @mediapipe/tasks-vision | Provides vision tasks for MediaPipe solutions. |
| react | Library for building user interfaces. |
| react-dom | Methods for interacting with the DOM in React. |
| react-redux | React bindings for Redux state management. |
| react-scripts | Scripts and configurations for React app development. |
| react-toastify | Displays toast notifications in React apps. |
| react-confetti | Renders confetti animations for celebrations. |
| redux | State management library for applications. |
| @reduxjs/toolkit | Toolkit for efficient Redux development. |
| web-vitals | Measures user-centric web performance metrics. |
| css-loader | Resolves and loads CSS files in webpack. |
| postcss | CSS post-processor for transforming styles. |
| postcss-flexbugs-fixes | Fixes flexbox bugs in PostCSS. |
| postcss-loader | Loads and processes CSS files with PostCSS in webpack. |
| tailwindcss | Utility-first CSS framework for rapid UI development. |
🔮To implement Offline Caching, I’ve used the Workbox library. Caching assets with a service worker can speed up repeat visits and provide offline support. Workbox makes this easy and is included in React App by default. Feel free to explore this guide to know more!
| Dependency | Description |
|---|---|
| workbox-background-sync | Enables background synchronization. |
| workbox-broadcast-update | Broadcasts updates to service workers. |
| workbox-cacheable-response | Caches responses with strategies. |
| workbox-core | Core library for Workbox service workers. |
| workbox-expiration | Manages expiration policies for cached resources. |
| workbox-navigation-preload | Enables navigation preload with Workbox. |
| workbox-precaching | Precaches resources during service worker installation. |
| workbox-range-requests | Supports ranged requests in caching strategies. |
| workbox-routing | Implements routing strategies for service workers. |
| workbox-strategies | Offers caching strategies for Workbox service workers. |
| workbox-streams | Handles streams for caching with Workbox. |
Not to mention, this particular topic shall be discussed in detail later on. Let’s move on to the next.
Beside the root HTML file, the public directory contains static assets like images, favicon, and audio files. It also contains the MediaPipe HandLandmarker TASK file which is used during precaching for offline use. We’ll cover this in detail later on.

ⓘ The
publicdirectory additionally houses the manifest and robots files, which are used to provide metadata for the web app and to exclude certain files from being crawled by search engines, respectively.
Let’s navigate back to the top level:
-
The tailwind.config.js file is used to configure Tailwind CSS. It’s a configuration file that allows to customize the default settings of Tailwind CSS. It’s also used to add third-party plugins to Tailwind CSS. Feel free to explore this guide to know more!
-
The postcss.config.js file is used to configure PostCSS. It’s a configuration file that allows to customize the default settings of PostCSS. Feel free to surf this to know more!
-
The “
src” aka “Source” folder of the React app is the main source code directory containing React components, Redux logic, and utility files. Let’s preview the structure once again:
1📁./src ♦♦ 𝐌𝐞𝐚𝐧𝐢𝐧𝐠2│ |3├── App.jsx | → React Component Heirarchy4├── index.css | → CSS File (Fueled by Tailwind)5├── index.jsx | → Heart of React App6│ |7│ |8├── components | → Components Directory9│ │ |10│ ├── CustComponents | → Custom Components Directory11│ │ │ |12│ │ ├── CombinedCard.jsx | → Card Component13│ │ ├── CursorTip.jsx | → Cursor Component14│ │ ├── ModalC1.jsx | → Modal Component15│ │ ├── TimeComponent.jsx | → Time & Date Component16│ │ └── UIalert.jsx | → Notification Component17│ │ |18│ ├── Landing.jsx | → Landing Preview of App19│ ├── Kernel.jsx | → Brain of App20│ └── DashboardUI.jsx | → Main Dashboard of App21│ |22│ |23├── redux | → Redux Directory24│ │ |25│ ├── gesture |26│ │ ├── gesture.forms.js | → Gesture Types27│ │ ├── gesture.handler.js | → Gesture Reducer28│ │ └── gesture.ops.js | → Gesture Actions29│ │ |30│ ├── root.handler.js | → Root Reducer31│ └── store.js | → Redux Store32│ |33│ |34├── reportWebVitals.js | → Performance Tracking File35├── service-worker.js | → Offline Caching Script36├── serviceWorkerRegistration.js | → Service worker Setup37│ |38│ |39└── utils |40 └── allGesture.js | → Gesture Definitions
- App.jsx: This defines the main application component structure, rendering the
Kernel,CursorTip,UIalert, andLandingcomponents within a full-screen div with a gray background.

-
index.css: This is the global CSS file which sets up Tailwind CSS utilities, hides scrollbars, enables smooth scrolling behavior, and provides special gradient hover effects for buttons in the DashboardUI component.
-
index.jsx: This renders the
Appcomponent within a ReduxProviderfor state management, wrapped in a strict mode, usingReactDOM.createRoot. It also registers a service worker for offline support and faster loading, and (can) measure app performance usingreportWebVitals().
🧐Although we’re not utilzing reportWebVitals.js in the app, but can help to capture various web performance metrics using the Web-Vitals library and passes them to a provided callback function for analysis and monitoring.
Let’s move into CustComponents 📂:
Inside components directory, we have several components & a respective folder named “CustComponents”, which essentially refers to custom components.
Let’s start by looking into CustComponents.

- CombinedCard.jsx: This functional component renders a customizable card element with different styles based on the provided type. It also checks for hover and click events to trigger specific actions.
💡I’ve added inline comments for better readablilty.
1// `isHovering` is a function that checks if the card is being hovered over2// by the user's hand.34// It's obtained from the `props.finger_locx` array, which contains the5// coordinates of the user's hand. It calculates the position of the card6// and compares it with the finger location to determine if it's hovering.78 const isHovering = () => {9 if (!props.finger_locx) return false;10 const pos = actionPose(cardRef.current);11 if (pos.x === 0) return false;1213 const hpos = {14 x: window.innerWidth - props.finger_locx[8].x * window.innerWidth,15 y: props.finger_locx[8].y * window.innerHeight16 };1718 if (19 pos.x <= hpos.x &&20 hpos.x <= pos.x + cardRef.current.offsetWidth - 12 &&21 pos.y <= hpos.y &&22 hpos.y <= pos.y + cardRef.current.offsetHeight - 1223 )24 return true;25 else return false;26 };272829 // When the user hovers over the card and clicks, the component checks if30 // the Redux store has the "CLICK" gesture and an onClick prop.31 // If both are present, and the card was not clicked in the last second,32 // it triggers the onClick function and updates the lastClicked state.3334 if (isHovering()35 && props.gesture === "CLICK"36 && props.onClick37 && Date.now() - 1000 > lastClicked) {38 props.onClick();39 setLastClicked(Date.now());40 }
ⓘ An example preview of the CombinedCard.jsx component:
💡It connects to the Redux store to access hand gesture data and utilizes the connect function from react-redux.
A store holds the whole state tree of an application. The only way to change the state inside it is to dispatch an action on it. More info about Redux Store can be accessed 🔗here.

- CursorTip.jsx: This functional component renders the cursor element on the screen and displays a certain background color and border based on the provided gesture from the Redux store. The cursor’s position is updated according to the
finger_locxdata, and it disappears after a short delay.
1// We use `useEffect` to update the cursor's position & visibility on2// the screen based on the `props.finger_locx` provided from the Redux store.3 useEffect(() => {4 if (!props.finger_locx) return;56 // Cursor's position and visibility are controlled via values in `props.finger_locx`.7 // We use index finger's x and y coordinates to calculate its position relative8 // to the window size. When `props.finger_locx` is available, the cursor is9 // displayed and disappears after 500 milliseconds using `setTimeout`.10 const cursorStyle = cursorRef.current.style;11 cursorStyle.display = "flex";12 cursorStyle.left = `${window.innerWidth - props.finger_locx[8].x * window.innerWidth}px`;13 cursorStyle.top = `${props.finger_locx[8].y * window.innerHeight}px`;1415 const interval = setTimeout(() => {16 cursorStyle.display = "none";17 }, 500);1819 return () => clearTimeout(interval);20 }, [props.finger_locx]);21
ⓘ An example preview of the CursorTip.jsx component:
💡It connects to the Redux store to access hand gesture data and utilizes the connect function from react-redux.

- ModalC1.jsx: This functional component renders a modal with different content based on the
showModalandshowModal2props. It utilizes thehandleModalInteractionprop to handle click events when the modal is displayed.
1// minified version2const ModalC1 = ({ showModal, showModal2, handleModalInteraction }) =>3 showModal ? (4 <div className="fixed top-0 ... bg-black" onClick={handleModalInteraction}>5 <img src="./initialModal.gif"6 alt=""7 className="w-2.5/5 ... pointer-events-none" />8 </div>9 ) : showModal2 ? (10 <div className="fixed top-0 ... bg-black" onClick={handleModalInteraction}>11 <img src="./nextModal.png"12 alt=""13 className="w-3/5 ... pointer-events-none" />14 </div>15 ) : null;
ⓘ An example preview of the ModalC1.jsx component:

- TimeComponent.jsx: This functional component displays the current time along with day information.
1// State for storing the formatted time2const [time, setTime] = useState(getFormattedTime());34// Update the time every second using the useEffect hook5useEffect(() => {6 // Set up an interval to update the time7 const intervalId = setInterval(() => {8 const formattedTime = getFormattedTime();9 setTime(formattedTime);10 }, 1000);1112 // Clear the interval when the component is unmounted13 return () => clearInterval(intervalId);14}, []);1516// Initialize day name, month, and day using the useEffect hook17useEffect(() => {18 const today = new Date();19 const dayIndex = today.getDay();20 const days = ["Sun", "Mon", "Tue", "Wed", "Thu", "Fri", "Sat"];21 const monthNames = [22 "Jan", "Feb", "Mar", "Apr", "May", "Jun",23 "Jul", "Aug", "Sep", "Oct", "Nov", "Dec"24 ];2526 // Set day name, month, and day based on the current date27 setDayName(days[dayIndex]);28 setMonth(monthNames[today.getMonth()]);29 setDay(String(today.getDate()).padStart(2, "0"));30}, []);3132// format the current time as "hh:mm:ss"33function getFormattedTime() {34 const currentTime = new Date();35 return currentTime.toLocaleTimeString(navigator.language, {36 hour: "2-digit",37 minute: "2-digit",38 second: "2-digit",39 });40}
ⓘ This Date & Time component is hugely inspired by Google Meet’s UI! 😁

- UIalert.jsx: This functional component displays different alerts based on the
gesture,finger_locx, andloadedprops passed to it. It also listens for a Backspace key press event and triggers the “BACKSPACE” gesture accordingly.
1// This function takes a msg argument and returns a corresponding message2// based on the provided msg. It maps different gestures to appropriate3// messages like "Hovering 🤚," "Grabbing ✊," "Undo Input ✋," or "Clicking 👌".4const messageFrom = (msg) => {5 if (msg === "HOVER") return "Hovering 🤚"; // Hovering Alert6 else if (msg === "GRAB") return "Grabbing ✊"; // Modal-preview Alert7 else if (msg === "BACKSPACE") return "Undo Input ✋"; // Undo Input Alert8 else return "Clicking 👌"; // Clicking Alert9};101112// Conditional Rendering of Alerts13if (!loaded) {14 return null;15} else if (status === "no") { // status is "no" and loaded is "true"16 // ... (rest of the code)17} else if (status === "GRAB") { // status is "GRAB" and loaded is "true"18 // ... (rest of the code)19} else {20 // ... (rest of the code)21}222324// The component is connected to the Redux store using `connect`,25// mapping `gesture`, `finger_locx`, and `loaded` states to props.26const PropMapFromState = (state) => ({27 gesture: state.hand.gesture,28 finger_locx: state.hand.finger_locx,29 loaded: state.hand.loaded,30});
ⓘ An example preview of the UIalert.jsx component can inspected in the “Alert” of the CursorTip.jsx preview, which can be found above!
💡It connects to the Redux store to access hand gesture data and utilizes the connect function from react-redux.
Let’s come back to the components directory 📂:
- Landing.jsx: This functional component handles the initial loading of the application, checks camera permission, and renders content based on the permission status and loaded state from the Redux store. If permission is granted and the application is
loaded, it renders the main user interface provided by theDashboardUIcomponent.
1// Two states declared using `useState` hook: `loaded` is initialized with value2// of `props.loaded` & `cameraPermissionAllowed` is initialized with `false`3 const loaded=props.loaded;4 const [cameraPermissionAllowed, setCameraPermissionAllowed] = useState(false);56 // `useEffect` hook is used to check if the camera permission is granted or not7 // and set the state of `cameraPermissionAllowed` accordingly89 useEffect(() => {10 const checkCameraPermission = async () => {11 try {12 // Request for camera permission13 await navigator.mediaDevices.getUserMedia({ video: true });14 // Set state of `cameraPermissionAllowed` to `true`15 setCameraPermissionAllowed(true);16 } catch (error) {17 console.error("Camera permission not allowed:", error);18 setCameraPermissionAllowed(false);19 }20 };2122 checkCameraPermission(); // Check camera permission when component is mounted2324 // Set a timer of 5.5 seconds to call the `putInitialze`25 const timer = setTimeout(() => {26 props.putInitialze();27 }, 5500);2829 return () => clearTimeout(timer);30 // eslint-disable-next-line31 }, []);323334// when component is unmounted35if (!loaded) {36 return (37 // ... (rest of the code)38 );39} else {40 return <DashboardUI />;41}4243// ... (rest of the code)4445// The `Landing` component is exported using the `connect` from `react-redux`.46export default connect(PropMapFromState, mapDispatchToProps)(Landing);
ⓘ An example preview of the Landing.jsx component:
💡It connects to the Redux store to access hand gesture data and utilizes the connect function from react-redux.

- Kernel.jsx: This is the key functional component that handles the real-time hand tracking and gesture recognition using the Mediapipe library.
🧠Technically, this is the Brain of the app & fuels all the magic that you can see!
ⓘ Also, ”@mediapipe/tasks-vision” comes with the
DrawingUtilsclass out of the box, which easily allows to skip importing ”@mediapipe/drawing_utils” to draw the Hand Landmarks & Connectors (as implemented in this). This improves the overall inference speed!
1️⃣First we import the MediaPipe tasks-vision package along with other necessary dependencies:
1// import the MediaPipe tasks-vision package2import { FilesetResolver, HandLandmarker } from '@mediapipe/tasks-vision';34// React & Redux5import { useRef, useEffect } from 'react';6import { connect } from 'react-redux';78// Gesture Actions9import { putGesture, putFingLock, putInitialze } from '../redux/gesture/gesture.ops';10import { rightHandGestures, leftHandGestures } from '../utils/allGesture';
2️⃣Define the Kernel Component:
1// here three props are taken as input → putGesture, putFingLock, and putInitialze.2// We also create a canvasRef using the useRef hook to reference the canvas element.3function Kernel({ putGesture, putFingLock, putInitialze }) {4 const canvasRef = useRef(null);5 // ... (rest of the code)
3️⃣Then inside main function, define the keypoints and then draw the connectors:
1// `useEffect` is used to detect hand landmarks and draw them on2// the canvas using the `drawLandmarksAndConnectors` function.3 useEffect(() => {4 const drawLandmarksAndConnectors = (landmarks, ctx) => {56 // Draw keypoints7 const connections = [8 // ... (rest of the code)9 ];1011 ctx.strokeStyle = 'white'; // define stroke color12 ctx.lineWidth = 4; // define stroke width1314 // draw connectors15 for (const connection of connections) {16 const [index1, index2] = connection;1718 // calculate the pixel positions of the landmarks using the19 // normalized x and y values and draw the lines using ctx.stroke()20 ctx.beginPath();21 // ... (rest of the code)22 ctx.stroke();23 }2425 // Draw landmarks26 ctx.fillStyle = 'teal';27 for (const landmark of landmarks) {28 ctx.beginPath();29 // ... (rest of the code)30 ctx.fill();31 }32 };
4️⃣Initialize the Task (with local-load and failsafe enabled):
1 const loadModelAndStartDetection = async () => {2 // load from CDN (Mandatory → else CORS blocks all internal requests)3 const vision = await FilesetResolver.forVisionTasks(4 'https://cdn.jsdelivr.net/npm/@mediapipe/tasks-vision@0.10.2/wasm'5 );67 // create an instance of the HandLandmarker class with the specified options8 let handLandmarker;9 try {10 // Load hand_landmarker task from local path (speeds up loading)11 // create an instance of the HandLandmarker class with the specified options12 handLandmarker = await HandLandmarker.createFromOptions(vision, {13 baseOptions: {14 modelAssetPath:15 '/hand_landmarker.task', // Local Fetch16 delegate: 'GPU', // use GPU for inference17 },18 runningMode: 'IMAGE' || 'VIDEO', // Image first then video (always!)19 numHands: 1,20 minHandDetectionConfidence: 0.6,21 minHandPresenceConfidence: 0.6,22 // minHandTrackingConfidence: 0.5, // this is set by default23 });24 } // ... (rest of the code)2526 try {27 // Load hand_landmarker task from CDN as fallback28 handLandmarker = await HandLandmarker.createFromOptions(vision, {29 baseOptions: {30 // Tasks-Vision itself has hand-landmarker → https://shorturl.at/kwQX131 modelAssetPath: 'hand_landmarker.task',32 // ... (rest of the code // Similar as above)33 } catch (cdnError) {34 // ... (rest of the code)35 return;36 }37 }
ⓘ It’s optional to set the device delegate to run the MediaPipe pipeline. If the delegate is not set, the default delegate CPU is used. Here GPU is used for inference, which is faster than CPU. Feel free to customize the configuration options to achieve the best performance.
5️⃣Start the camera to enable real-time hand tracking, detect the handedness, & return keypoints on canvas:
1 // ... (continued from above)2 const cnvs = canvasRef.current; // cnvs variable is used to reference the canvas element3 const ctx = cnvs.getContext('2d'); // ctx → 2D rendering context for the canvas4 const vidElm = document.createElement('video'); // newly created video element56 // start the camera and detect hand landmarks & continuously update the canvas with the video stream7 const startCamera = async () => {8 try {9 // request access for video stream10 const stream = await navigator.mediaDevices.getUserMedia({ video: true, audio: false });11 vidElm.srcObject = stream; // set the video stream as the source of the video element12 // ... (rest of the code)13 await vidElm.play(); // awaits the video to start playing1415 const detectLandmarks = async () => {16 try {17 // detect hand landmarks from video stream, & store in results18 const results = handLandmarker.detect(vidElm);19 // extract the landmarks from the results20 const landmarks = results?.landmarks;21 // check if the detected hand is right/left22 const handType = (results?.handednesses[0]?.[0]?.categoryName) === "Left" ? "Right" : "Left";2324 // Clear canvas before drawing (if landmarks are detected)25 ctx.clearRect(0, 0, cnvs.width, cnvs.height);2627 if (landmarks && landmarks.length > 0) {28 ctx.drawImage(vidElm, 0, 0, cnvs.width, cnvs.height); // Draw video frame2930 if (handType === 'Right') {31 // ... (rest of the code)32 } else if (handType === 'Left') {33 // ... (rest of the code)34 }35 putFingLock(landmarks[0]);36 }37 else {38 // If hand landmarks are not detected, still draw the video frame (IMPORTANT!)39 ctx.drawImage(vidElm, 0, 0, cnvs.width, cnvs.height);40 }41 requestAnimationFrame(detectLandmarks);42 };43 detectLandmarks();44 } // ... (rest of the code)45 };46 startCamera(); // start the camera47 };48 loadModelAndStartDetection();49 // ensure that detection and canvas rendering are updated when the gesture & finger state updates50 }, [putGesture, putFingLock, putInitialze]);
6️⃣Adjust the canvas size:
1useEffect(() => {2 const setCanvasSize = () => {3 // Set canvas size...4 };56 setCanvasSize();7 window.addEventListener('resize', setCanvasSize);89 return () => {10 window.removeEventListener('resize', setCanvasSize);11 };12}, []);
7️⃣Render the Canvas:
1return (2 <div className="absolute ... filter-grayscale-80 opacity-10">3 <canvas className="transform scale-x-minus-1" ref={canvasRef} />4 </div>5);
8️⃣Dispatch the actions:
1const mapDispatchToProps = {2 putGesture,3 putFingLock,4 putInitialze,5};67export default connect(null, mapDispatchToProps)(Kernel);
💡It connects to the Redux store to access hand gesture data and utilizes the connect function from react-redux.
- DashboardUI.jsx: This is the central component of the web app that’s responsible for rendering and managing the user interface of the dashboard. It combines various UI elements, user interactions, and state management to provide a seamless and interactive user experience.
-
First we import the necessary dependencies:
JSX1// we import the necessary dependencies2import { useState, useEffect, useRef } from "react"; // React Hooks3import { connect } from "react-redux"; // Redux45import Confetti from "react-confetti"; // Confetti6import { ToastContainer, toast } from 'react-toastify'; // Toast Notifications7import 'react-toastify/dist/ReactToastify.css';89import CombinedCard from "./CustComponents/CombinedCard"; // Card Component10import ModalC1 from "./CustComponents/ModalC1"; // Modal Component11import TimeComponent from "./CustComponents/TimeComponent"; // Time Component1213// Import audio files14const logoutSound = "/logoutMelody.mp3";15const beepboopSound = "/beepboopSound.mp3"; -
Create custom hooks & utility functions:
JSX1// utility function to generate a string of '*' of length 'len'2// generates a masked representation of the PIN based on the length of the PIN3const pinGen = (len) => "*".repeat(len);4// Custom Hook to handle modal interactions and keydown events5const useModalInteractions = () => {6 // ... (rest of the hook implementation)7 return { showModal, showModal2, handleModalInteraction };8};910// Custom Hook to handle ESC keydown events11const useEscKeyRedirect = (12 redirectFunc,13 isCase3,14 isCase4,15 playAudioOnRedirect,16 defPageNo,17 resetAccountBalance,18 resetPin) => {19 // ... (rest of the hook implementation)20};2122// ... (check repository for the code & add here ... )23// Functions for Toast Display Logic, PIN Entry and Validation,24// Amount Selection and Withdrawal, PIN Submission and Input Handling, etc.25// ... -
Define the DashboardUI component & render the UI accordingly:
JSX1function DashboardUI({ gesture }) {2 // ... (rest of the component implementation)3 switch (pageNo) {4 case 1: // Login Page5 return (6 <div id="panel-ui" className="absolute top-0 ... items-center ... p-10">7 <ToastContainer />8 <ModalC19 showModal={showModal}10 showModal2={showModal2}11 handleModalInteraction={handleModalInteraction}12 />13 {/* ... (rest of the JSX code) */}14 </div>15 );16 case 2: // ATM PIN Entry Page17 return (18 <div id="panel-ui" className="absolute top-0 ... flex-col ... p-10">19 <ToastContainer />20 {/* ... (rest of the JSX code) */}21 </div>22 );23 case 3: // Account Dashboard Page24 return (25 <div id="panel-ui" className="absolute top-0 ... flex-col ... p-10">26 <ToastContainer />27 {/* ... (rest of the JSX code) */}28 </div>29 );30 case 4: // Fast Cash Page31 return (32 <div id="panel-ui" className="absolute top-0 ... flex-col ... p-10">33 <ToastContainer />34 {/* ... (rest of the JSX code) */}35 </div>36 );37 default:38 return <></>;39 }40} -
Dispatch the actions & export:
JSX1const PropMapFromState = (state) => ({2 gesture: state.hand.gesture,3});45export default connect(PropMapFromState)(DashboardUI);
ⓘ Different case-wise previews of the Dashboard.jsx component:
💡It connects to the Redux store to access hand gesture data and utilizes the connect function from react-redux. On certain pages, users have the option to use the “Backspace” and “ESC” keys to initiate particular actions, allowing them to “undo” or “navigate back” to previous screens.

✅Now we’re finally done with the React components. Let’s move on to the Redux store.
Inside the redux directory, we have one subdirectoriy: gesture & rest we have the Redux Reducer & the Store.
ⓘ Architecture of Redux:

Let’s start with the gesture directory.
- gesture.forms.js: It define action types used in the Redux store for gestures.
1// Export action types used in the Redux store2export const GEST_ASSIGN = "GEST_ASSIGN";3export const FINLOCK_ASSIGN = "FINLOCK_ASSIGN";4export const INIT_ASSIGN = "INIT_ASSIGN";
- gesture.handler.js: It defines the initial state of the Redux store and the reducer function that handles the state updates.
1// import action types2import { GEST_ASSIGN, FINLOCK_ASSIGN, INIT_ASSIGN } from "./gesture.forms";34// define `initialState` object for Redux store, containing these three props5const initialState = {6 gesture: null, finger_locx: null, loaded: false,7};89// `state` = current state of Redux store ; `action` i= dispatched action10const gestureHandler = (state = initialState, action) => {11 switch (action.type) {12 case GEST_ASSIGN:13 return {14 ...state,15 gesture: action.payload,16 };17 case FINLOCK_ASSIGN:18 return {19 ...state,20 finger_locx: action.payload,21 };22 case INIT_ASSIGN:23 return {24 ...state,25 loaded: true,26 };27 default:28 return state;29 }30};3132// export the reducer function33export default gestureHandler;
- gesture.ops.js: It defines the action creators that dispatch actions to the Redux store.
1// Action creator functions to create actions with specific types and payload data to dispatch to the reducer.2// Action creators are functions that return an action object with a type and payload property.34// import action types5import { GEST_ASSIGN, FINLOCK_ASSIGN, INIT_ASSIGN } from "./gesture.forms";67export const putGesture = (gesture) => ({8 type: GEST_ASSIGN,9 payload: gesture,10});1112export const putFingLock = (locs) => ({13 type: FINLOCK_ASSIGN,14 payload: locs,15});1617export const putInitialze = () => ({18 type: INIT_ASSIGN,19});
Let’s move back to the redux directory 📁:
- root.handler.js: It combines the reducers from different modules and creates the root reducer for the Redux store.
1import { combineReducers } from "redux";2import gestureHandler from "./gesture/gesture.handler";34export default combineReducers({5 hand: gestureHandler,6});
- store.js: It creates the Redux store using the root reducer and exports it.
1import { configureStore } from "@reduxjs/toolkit";2import rootReducer from "./root.handler";34const store = configureStore({5 reducer: rootReducer,6});78export default store;
✅Now we’re done with the Redux part. Let’s move on to the utils directory.
- allGesture.js: It defines the different gestures that the app can recognize for both the left and right hands. This is very important for the app to work properly. Let’s take a look at the code:
1// This is the logic for the gesture recognition.2// Takes in parameter input from MP hand_landmarker which is an array of3// 21 landmarks representing the coordinates of hand keypoints45// Function for right hand gestures6function rightHandGestures(landmarks) {7 const [thumbIsOpen, indexIsOpen, middleIsOpen, ringIsOpen, littleIsOpen] = [ // Values assigned to corresponding fingers8 landmarks[3].x < landmarks[2].x && landmarks[4].x < landmarks[2].x,9 landmarks[7].y < landmarks[6].y && landmarks[8].y < landmarks[6].y,10 landmarks[11].y < landmarks[10].y && landmarks[12].y < landmarks[10].y,11 landmarks[15].y < landmarks[14].y && landmarks[16].y < landmarks[14].y,12 landmarks[19].y < landmarks[17].y && landmarks[18].y < landmarks[17].y13 ];1415 // Above is set to true by default if x-coordinate of finger tip is less than x-coordinate of finger base (else false)16 // Reference: https://github.com/google/mediapipe/blob/master/docs/solutions/hands.md#hand-landmark-model1718 if (!thumbIsOpen && !indexIsOpen && !middleIsOpen && !ringIsOpen && !littleIsOpen) {19 return "GRAB";20 }21 // Euclidean distance between the tip of the index finger and the tip of the thumb22 else if (Math.sqrt(Math.pow(landmarks[4].x - landmarks[8].x, 2) + Math.sqrt(Math.pow(landmarks[4].y - landmarks[8].y, 2))) < 0.25) {23 return "CLICK";24 }25 else if (thumbIsOpen && indexIsOpen && middleIsOpen && ringIsOpen && littleIsOpen && landmarks[0].y > landmarks[12].y) {26 return "BACKSPACE";27 }28 else {29 return "HOVER";30 }31}3233// Function for left hand gestures34function leftHandGestures(landmarks) {35 const [thumbIsOpen, indexIsOpen, middleIsOpen, ringIsOpen, littleIsOpen] = [ // Values assigned to corresponding fingers36 landmarks[3].x < landmarks[2].x && landmarks[4].x < landmarks[2].x,37 landmarks[7].y < landmarks[6].y && landmarks[8].y < landmarks[6].y,38 landmarks[11].y < landmarks[10].y && landmarks[12].y < landmarks[10].y,39 landmarks[15].y < landmarks[14].y && landmarks[16].y < landmarks[14].y,40 landmarks[19].y < landmarks[17].y && landmarks[18].y < landmarks[17].y41 ];4243 if (!thumbIsOpen && !indexIsOpen && !middleIsOpen && !ringIsOpen && !littleIsOpen) {44 return "GRAB";45 }46 // Euclidean distance between the tip of the index finger and the tip of the thumb47 else if (Math.sqrt(Math.pow(landmarks[4].x - landmarks[8].x, 2) + Math.sqrt(Math.pow(landmarks[4].y - landmarks[8].y, 2))) < 0.25) {48 return "CLICK";49 }50 else if (thumbIsOpen && indexIsOpen && middleIsOpen && ringIsOpen && littleIsOpen && landmarks[0].y > landmarks[12].y) {51 return "HOVER";52 }53 else {54 return "BACKSPACE";55 }56}5758// Export the functions (for both left and right hand gestures)59export { rightHandGestures, leftHandGestures };
These functions take an array of hand landmarks as input and analyze the positions of (hand) keypoints to determine the gesture being performed by either the right or left hand. Let’s explain this in detail.
⚙️In my previous blog post Predicting Custom Gestures, we explored creating a custom model using MediaPipe Model Maker for predicting and classifying hand gestures in web demos. Now, we’ll use the
HandLandmarkertask instead ofGestureRecognizerto streamline the process and reduce inference time. Detailed discussion follows below.
For now let’s consider any of the two hands. In this section of the code:
1const [thumbIsOpen, indexIsOpen, middleIsOpen, ringIsOpen, littleIsOpen] = [2 landmarks[3].x < landmarks[2].x && landmarks[4].x < landmarks[2].x,3 landmarks[7].y < landmarks[6].y && landmarks[8].y < landmarks[6].y,4 landmarks[11].y < landmarks[10].y && landmarks[12].y < landmarks[10].y,5 landmarks[15].y < landmarks[14].y && landmarks[16].y < landmarks[14].y,6 landmarks[19].y < landmarks[17].y && landmarks[18].y < landmarks[17].y7];
We are calculating whether the five respective fingers on a detected hand are “open” or “closed” based on the positions of their landmarks. The landmarks represent specific points on the hand when detected via the MediaPipe Hand Landmarker task.
Here’s the breakdown of what’s happening:
1️⃣“landmarks” represents an array of landmarks detected on the hand. Each landmark is a point with x and y coordinates, indicating its position in the 2D (Cartesian) space of the image.

2️⃣The code uses these landmarks to determine whether specific fingers are open or closed:
- For the thumb (
thumbIsOpen), it checks if thexcoordinate of the tip (landmarks[4]) and the base (landmarks[2]) of the thumb are both on the same side (i.e., the tip is to the left of the base). If they are on the same side, the thumb is considered open. - Similar comparisons are made for the index, middle, ring, and little fingers, checking if their
ycoordinates of their tips and bases are on the same side. If they are on the same side, the respective finger is considered open.
3️⃣The variables thumbIsOpen, indexIsOpen, middleIsOpen, ringIsOpen, and littleIsOpen will be either true or false based on whether the corresponding fingers are open or closed.

Next, we continue to determine the type of gesture being performed based on the calculated values. Here’s the explanation for the remaining parts of the code (for right hand exclusively):
1// if all fingers are closed2if (!thumbIsOpen && !indexIsOpen && !middleIsOpen && !ringIsOpen && !littleIsOpen) {3 return "GRAB"; // Action → Preview Information Modal4}56// Euclidean distance between the tip of the index finger and the tip of the thumb7else if (Math.sqrt(Math.pow(landmarks[4].x - landmarks[8].x, 2) +8 Math.sqrt(Math.pow(landmarks[4].y - landmarks[8].y, 2))) < 0.25) {9 return "CLICK"; // Action → Click10}1112// if all fingers are open and the center axis of the hand is rotated13// 180 degrees with respect to the camera14else if (thumbIsOpen && indexIsOpen && middleIsOpen &&15 ringIsOpen && littleIsOpen && landmarks[0].y > landmarks[12].y) {16 return "BACKSPACE"; // Action → Undo last input17}1819// Default case20else {21 return "HOVER"; // Action → Hover22}

1️⃣The first condition checks if all fingers (thumb, index, middle, ring, & little finger) are closed. If all fingers are closed i.e. “✊”, the gesture is considered a ”GRAB“.
2️⃣The second condition calculates the Euclidean distance between the tip of the index finger (landmarks[8]) and the tip of the thumb (landmarks[4]). If this distance is less than 0.25 (which indicates that the tips are very close, i.e. “👌”), the gesture is considered a ”CLICK”. This condition represents a pinch-like motion between the thumb and index finger, simulating a click.
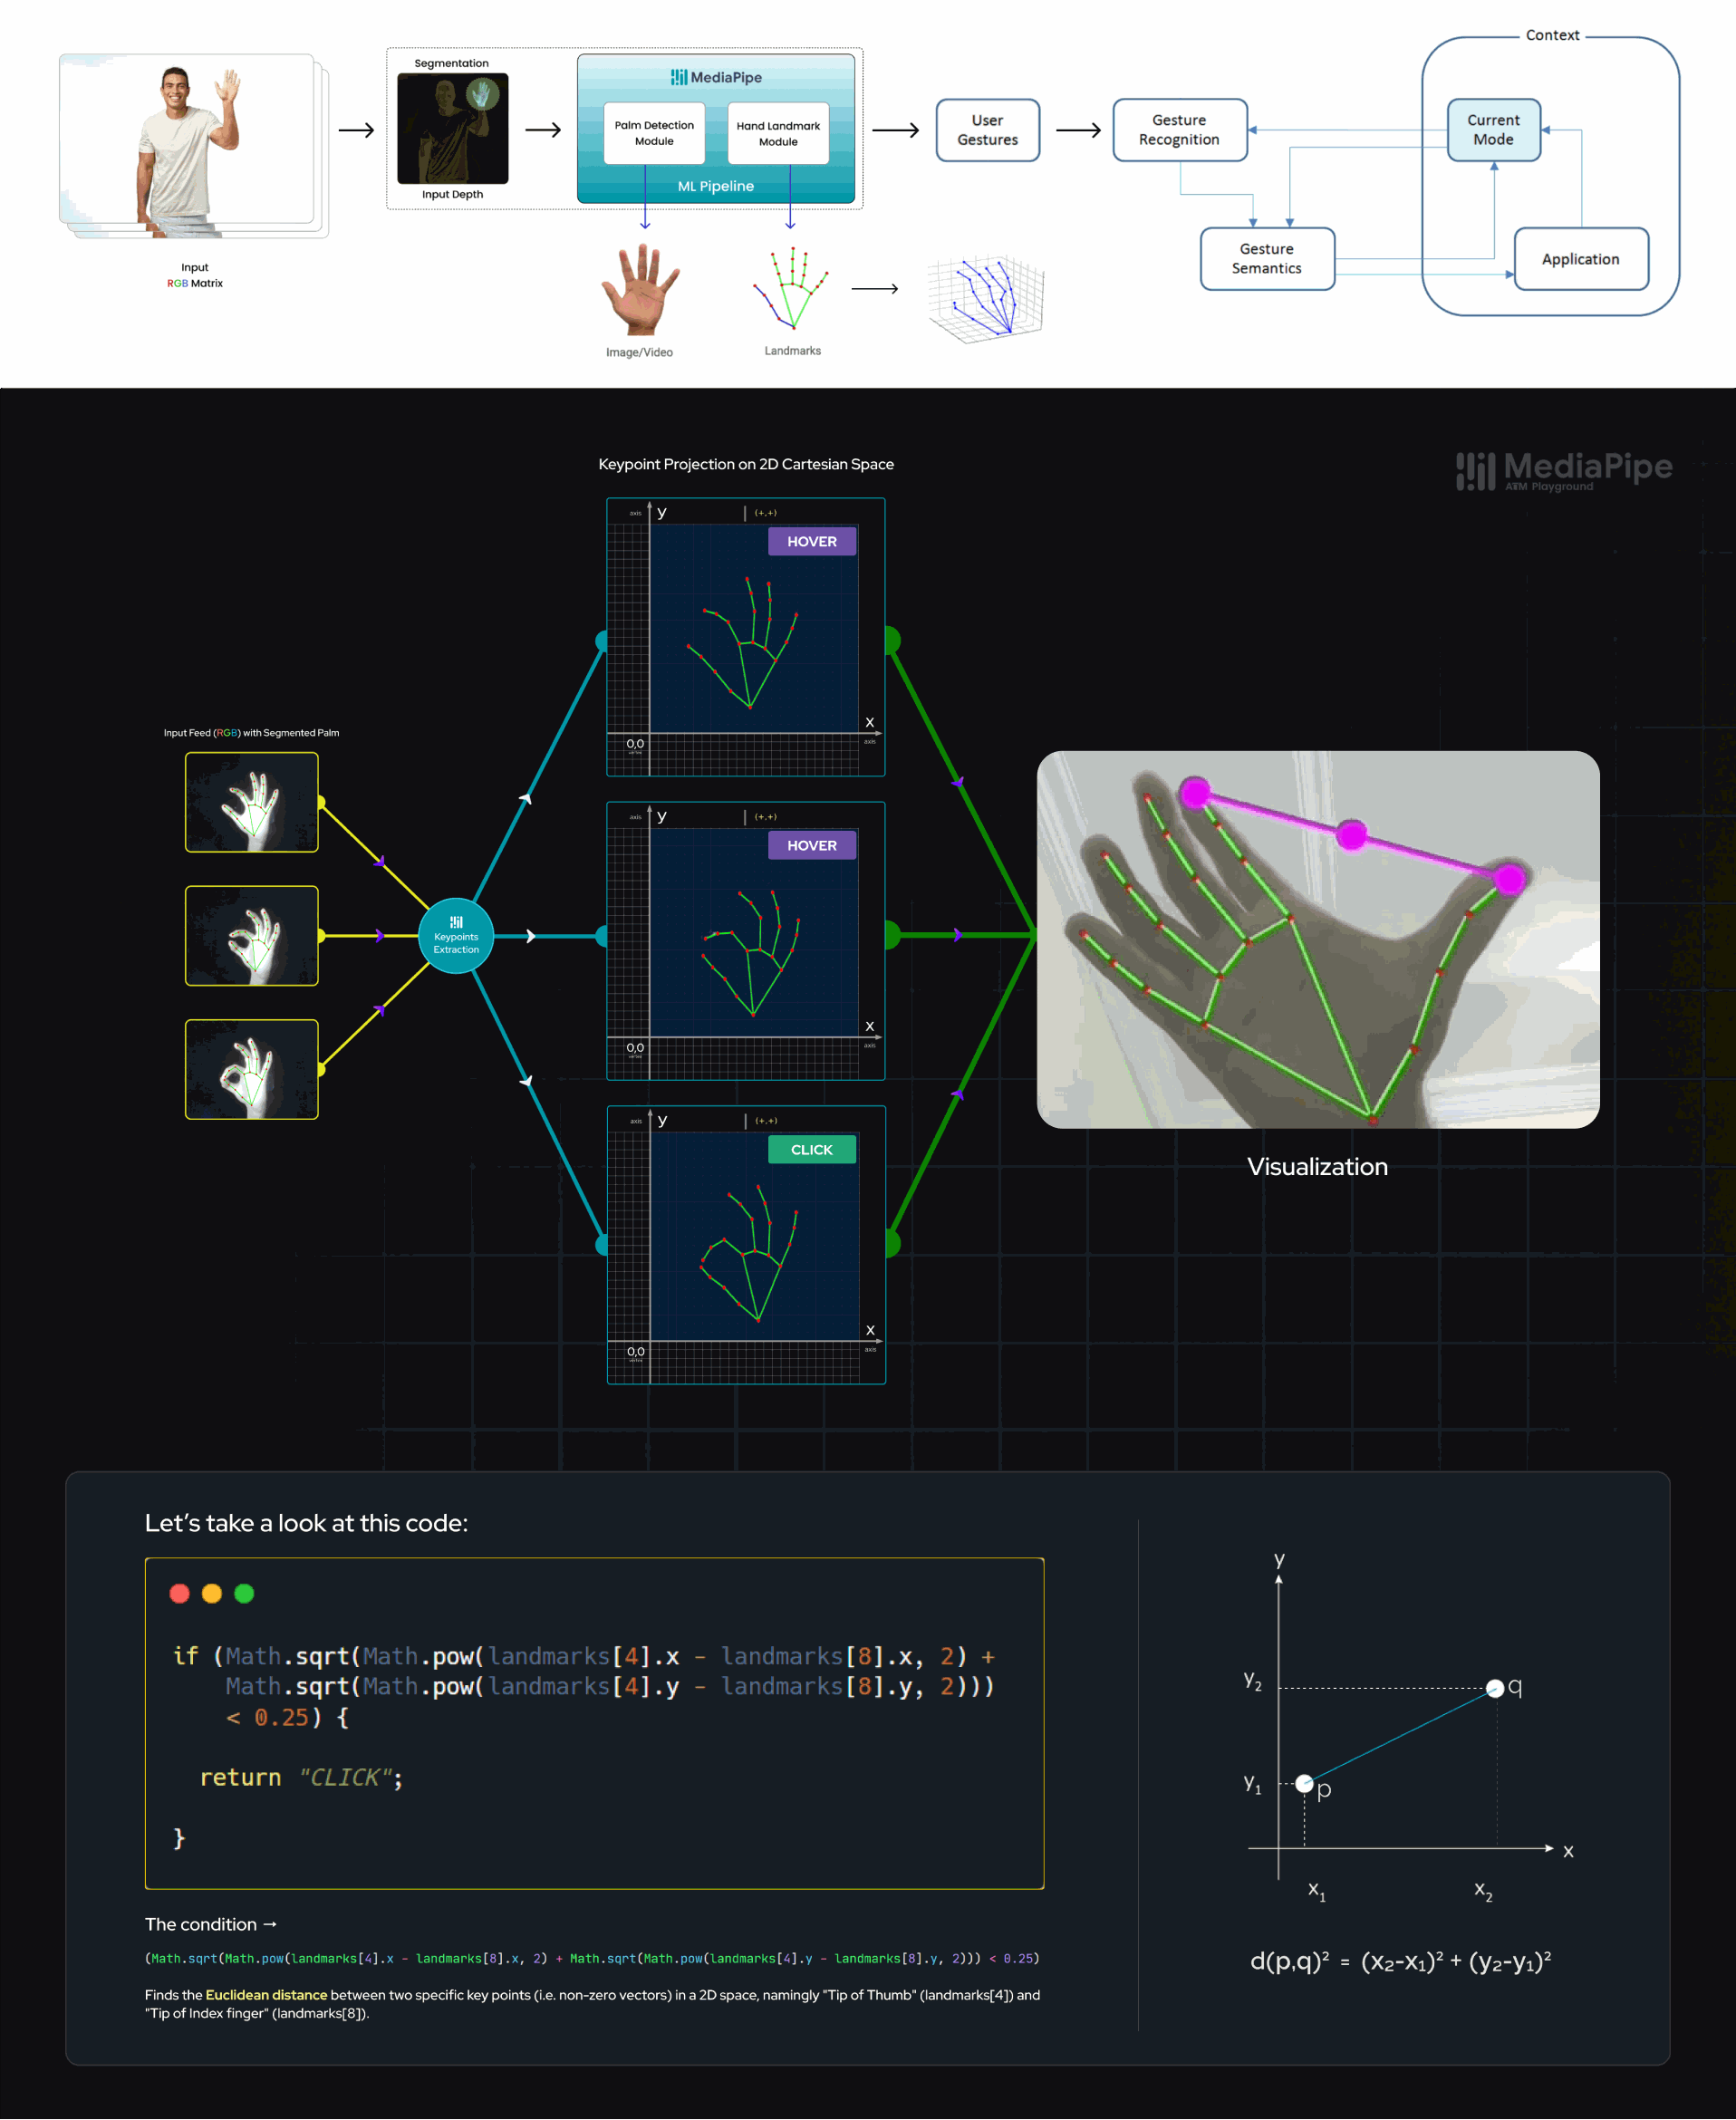
So, what’s happening exactly? 🤔
🟢In the provided code, we initially calculate the difference in the x-coordinates of the two landmarks,
landmarks[4].x - landmarks[8].x, and similarly compute the difference in y-coordinateslandmarks[4].y - landmarks[8].y. We then squares both differences usingMath.pow()to get their squares. Finally, we add the squared *x and y differences together, take the square root usingMath.sqrt(), and compare the result with a fixed constant, which is set to 0.25.🟢If the computed distance turns out to be less than this threshold of 0.25, it means the two landmarks are close together, and hence we yield ”CLICK”. This indicates that it’s is recognizing a hand gesture similar to a click or tap (”👌”), where the “Thumb” and “Index finger” are close enough to each other to signify a clicking action. The selection of the threshold value, 0.25, is arrived at through empirical experimentation, involving multiple trials aimed at achieving optimal accuracy and reliable performance.
3️⃣The third condition checks if all fingers are open and the right-hand palm is faced backwards towards the camera, i.e. “✋”, where it is vertically flipped along the mid axis (i.e. projection on y-axis) of the right hand, with respect to the tip of the middle finger (landmarks[12]) & wrist (landmarks[0]). If this condition is met, the gesture is considered a ”BACKSPACE“.
4️⃣If none of the above conditions are met, the gesture is considered a ”HOVER”. This is the default case, where none of the specific gestures (GRAB, CLICK, BACKSPACE) are detected, & all the fingers (of right hand) are open i.e. “🤚”.
The functions return strings representing different gestures such as “GRAB”, “CLICK”, “BACKSPACE”, or “HOVER”. These strings are then used to update the Redux store.
🧙 NOTE: We use the handedness from MediaPipe Hand Landmarker to determine which hand (Left/Right) is being used and then call the appropriate function to determine the gesture. As the left hand mirrors the right hand, the logic for “BACKSPACE” and “HOVER” gestures is reversed for the left hand compared to the right hand.
Let’s move back to the “src” directory. It can be noticed that there are two more files that we haven’t discussed yet. Without any further ado, let’s take a look at them.
- service-worker.js: This essentially configures the caching behavior, routing, and handling of requests for our Web App, enhancing its performance and offline capabilities.
- The service worker imports necessary modules from Workbox for caching, routing, and strategies.
1import { clientsClaim } from 'workbox-core';2import { ExpirationPlugin } from 'workbox-expiration';3import { precacheAndRoute,4 createHandlerBoundToURL } from 'workbox-precaching';5import { registerRoute } from 'workbox-routing';6import { StaleWhileRevalidate } from 'workbox-strategies';78clientsClaim();
- The
precacheAndRoutefunction is used to precache and route the assets generated during it’s build process. This step allows the application to serve cached resources efficiently.
precacheAndRoute(self.__WB_MANIFEST);
- The service worker is configured to handle navigation requests by routing them to the index.html (built version) shell of the application. This helps in achieving an “app shell” architecture! ✨
1const fileExtensionRegexp = new RegExp('/[^/?]+\\.[^/]+$');2registerRoute(3 ({ request, url }) => {4 if (request.mode !== 'navigate') {5 return false;6 }7 if (url.pathname.startsWith('/_')) {8 return false;9 }10 if (url.pathname.match(fileExtensionRegexp)) {11 return false;12 }13 return true;14 },15 createHandlerBoundToURL(process.env.PUBLIC_URL + '/index.html')16);
- Respective file extensions (e.g., .png, .mp3, .task, .gif) are cached and served using a ”stale-while-revalidate” strategy. This strategy serves cached content if available while fetching updated content in the background.
1registerRoute(2 ({ url }) =>3 url.origin === self.location.origin &&4 (url.pathname.endsWith('.png') ||5 url.pathname.endsWith('.mp3') ||6 url.pathname.endsWith('.jpg') ||7 url.pathname.endsWith('.task') ||8 url.pathname.endsWith('.gif')),9 new StaleWhileRevalidate({10 cacheName: 'assets',11 plugins: [12 new ExpirationPlugin({13 maxEntries: 50,14 maxAgeSeconds: 30 * 24 * 60 * 60, // 30 Days (optional)15 }),16 ],17 })18);
🛈 The Stale-While-Revalidate strategy in Workbox serves cached responses to users while also updating the cache with fresh data from the network in the background.
📌For security purposes (especially to avoid cache-poisoning), the support has been limited to active session only, and cache expiration of 30 days has been set with stale-while-revalidate strategy for achieving best performance.

💡The service worker listens for a custom message to trigger the skipWaiting function, which allows the web app to skip the waiting phase and activate the new service worker immediately!
1self.addEventListener('message', (event) => {2 if (event.data && event.data.type === 'SKIP_WAITING') {3 self.skipWaiting();4 }5});
⚠️Service workers are only available to “secure origins” (HTTPS sites, basically) in line with a policy to prefer secure origins for powerful new features. However http://localhost is also considered a secure origin, so if you can, developing on localhost is an easy way to avoid this error.
- serviceWorkerRegistration.js: This essentially ensures the service worker’s proper registration, validation, and handling for an improved offline experience and updates.
1// Register the service worker2export function register(config) {3 if (process.env.NODE_ENV === 'production' && 'serviceWorker' in navigator) {4 /* ... (code) */5 }6}78// Register a valid service worker9function registerValidSW(swUrl, config) {10 navigator.serviceWorker11 .register(swUrl)12 .then((registration) => {13 /* ... (code) */14 })15 .catch((error) => {16 console.error('Error during service worker registration:', error);17 });18}1920// Check validity of the service worker21function checkValidServiceWorker(swUrl, config) {22 // ... (code)23}2425// Unregister the service worker26export function unregister() {27 if ('serviceWorker' in navigator) {28 navigator.serviceWorker.ready29 .then((registration) => {30 registration.unregister();31 })32 .catch((error) => {33 console.error(error.message);34 });35 }36}
Testing the Service Worker 🧪
-
Open the live demo on your browser or run it locally on localhost.
-
If you’re accessing it for the first time, it might take some time to load the model & assets on your local (depending on your internet speed). Once it’s loaded, feel free to explore and interact with the demo for some amount of time.
-
Open DevTools by pressing “
Control+Shift+J” or “Command+Option+J” (Mac). The Console panel should appear. -
Then click on the “Network�” tab, which will open the Network panel. Click on “No Throttling” & uncheck the “Disable Cache” to make sure the cached data is accessible. Then simply toggle it to “Offline” & perform a normal refresh to make it run while offline.
-
If you want to compare different trials, you can use the profiler to capture the waterfall. The mean result of these trials can be found above.
⚠️Please note that if you terminate the current browser session, you will need to perform the initial load using an internet connection.
You can see the working & registration of the service worker in the below video. Check it out! 👇
🛈Since precaching is enabled, the app will work offline after the first load 🎉
Performance Benchmarks for the Web Application 📊
Below are the performance benchmarks for the web-app, obtained from the Waterfall statistics. The latency results represent the average latency observed on Ryzen 5 4600H processor with GPU (NVIDIA GTX 1650Ti). These benchmarks provide insights into the performance improvements achieved after implementing a service worker.
| Metric | Before Implementation | After Implementation | Improvement 📈 |
|---|---|---|---|
| Load Time | 16.8s | 6.1s | 275% |
🔹Browser: Google Chrome — Version 116.0.5845.97 (Official Build) (64-bit)
The performance boost achieved after the first load is significant, with the load time reducing from 16.8 seconds to 6.1 seconds which represents a remarkable improvement of 275% in load time efficiency! ⚡
ⓘ NOTE: The provided benchmarks and details are based on the information provided and may not reflect actual application performance in all scenarios.
Besides, if you face any errors, open Chrome DevTools and then check the Console panel for errors or review the previous steps to ensure that you didn’t miss anything.
And that’s a wrap! Thank you for joining me on this exciting adventure. Stay curious and keep exploring! 🚀
References 📌
Here are the links to some of the best resources to learn more about MediaPipe:
-
MediaPipe GitHub repository → 🔗 link
-
MediaPipe Hand Landmark Detection for Web → 🔗 link
-
CodeSandbox Docs → 🔗 link
-
Google AI Blogs → 🔗 link
-
Applying Hand Gesture Recognition for User Guide Application Using MediaPipe — Research Paper (ResearchGate, 2021) → 🔗 link
-
MediaPipe official research paper (Arxiv, 2020) → 🔗 link
License ⚖️
Copyright 2023 The MediaPipe Authors. Distributed under the Apache License 2.0. See LICENSE for more information.
Conclusion 🚀
That’s it for now! I hope you found the content valuable and insightful. I’m immensely thankful to my mentor Jen Person 👩 for granting me this wonderful opportunity. Her feedback and guidance have been instrumental in propelling the project forward. As this chapter comes to a close, remember that every ending marks the beginning of a new journey.
I’m excited to present this final blog in the Google Summer of Code series. It has been a transformative experience, and I can’t wait to share the culmination of my efforts with all of you. If you have any suggestions or feedback, don’t hesitate to get in touch with me on Twitter or LinkedIn. Your input is greatly valued! 😄

